End of the search for a free and simple Documentation tool (Part II)
In the second of this series of articles, i have simplified the sample application from my previous part into a more simpler class program.I have added more documenting tags.
We need NDoc to start with. Download it from here.
Then install it, make sure the check boxes for DotNet version 1.0 and 1.1 are selected during installation.
Let's get started, shall we....

Create a new class, name it MyClass. Then copy the following code below into it. Change the namespace accordingly as shown below.
This class contains a single field, a single property and a single method. I have tried to keep as simple as possible.
As u can see from the code it contains tags like etc.
These are compiled into the XML file that make up the documentation.
They are pretty much self explanatory. Save the project. Press F5. We saw see something like the lines below in green in our output window.
Select the Solution file in the dialog box from where we have store our application. Now compile NDoc. Once its done. Click on View. You will have a ready made document in MSDN style. As u can see the drop down contains a no of options. I have used the default and common MSDN format. Save this as a NDoc project. No need to change anything in the options given below Documentation type as shown in the figure below.

Compile the Project and View the document. We will get a document, something of the type shown in the figure below.

As u can see, we get a nicely formatted document in MSDN format.Now Compare the code in the project with the output document. You can easily understand the code. I have not divulged into the different tags available.
I have tried to use all the important tags that we will be using on a daily basis. Go through
the documentation provided with NDOC for further information.
In the final part of this series, we will see how to use the plug in for VB.NET.
Another good example of the kind that i have given above can be found at this link
http://www.codeproject.com/csharp/CSharpCodeDocumentation.asp
happy documentation
We need NDoc to start with. Download it from here.
Then install it, make sure the check boxes for DotNet version 1.0 and 1.1 are selected during installation.
Let's get started, shall we....
- Create a New C# Windows Console Application, Name it as TestingNDoc1.
- Rename name of Class1.cs to Main.cs.
- Copy the following code into it.
- Save the project.
using System;
using MyNamespace;
namespace NDocEx1
{
///
/// Summary description for the Main function of the MainClass.
///
public class MainClass
{

[STAThread]
static void Main(string[] args)
{
MyNamespace.MyClass aObject = new MyNamespace.MyClass();
aObject.SingleValue(100);
Console.WriteLine("Value is " + aObject.Value.ToString());
}
}
}

The following steps have to be done for us to use NDoc sucessfully...
In the main menu,
- click on Project
- Properties.
- Properties.
- Common Properties
- General - check if the name of the Assemble is defined
- General - check if the name of the Assemble is defined
- Configuration Properties
- Build
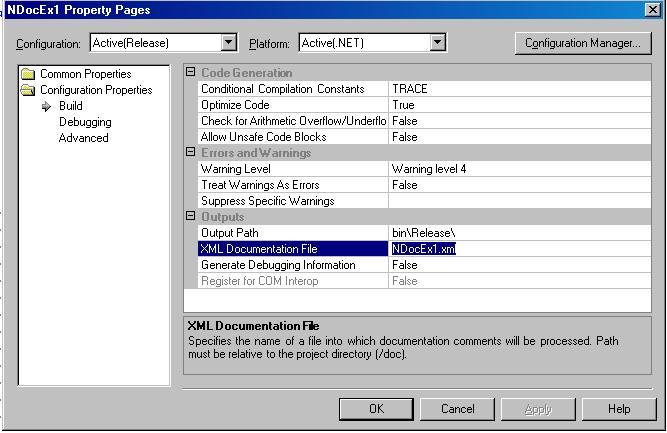
- Outputs - type "NDocEx1.xml" as the XMLDocument file
- Build
These are as shown in the figure below
Create a new class, name it MyClass. Then copy the following code below into it. Change the namespace accordingly as shown below.
using System;
namespace MyNamespace
{
///
///MyClass created under MyNamespace .
///
///
///More information about using this class across thread
///
public class MyClass
{
///
/// The defaultMyClass constructor.
///
public MyClass()
{
aField = 0;
}
///
///
///Theoverloaded constructor forMyClass .
///It accepts one parameter
///
///It accepts one parameter
///
/// This is aInteger type parameter.
///
/// This constructor provides the mechanism to intialize the newly created object with a default value.
///
public MyClass(int GivenValue)
{
aField = GivenValue;
}
///
///
///MyClass
///- aField
///- aProperty
///- aMethod
///
///
///
private int aField;
///
///MyClass has this one property defined.
///
/// The property accepts and shows the value in the local variable.
///
///
///The property handles the Integer datatype .
public int Value
{
get
{
return aField;
}
set
{
aField = value;
}
}
///
/// TheSingleValue method assigns the given value into the local variable ofMyClass class.
///
///Returns nothing.
///Value is of type Integer.
///
/// We can add code snippets or exception info like the one below.
///
/// Accepts a value of type Integer
///
///
/// public returnDatatype FunctionName(datatype value[,...])
/// {
/// code
/// }
///
///
///Thrown when... .
///[NDoc]
///[Value]
public void SingleValue(int SomeValue)
{
aField = SomeValue;
}
}
}
This class contains a single field, a single property and a single method. I have tried to keep as simple as possible.
As u can see from the code it contains tags like
These are compiled into the XML file that make up the documentation.
They are pretty much self explanatory. Save the project. Press F5. We saw see something like the lines below in green in our output window.
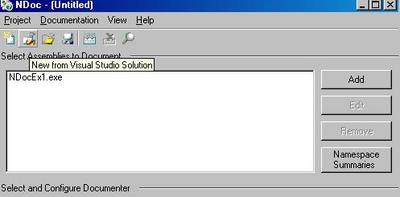
Check NDocTestingDocument.xml has been created under the Project directory. We are ready to document the above project. Run NDOC, i have (DotNet1.1), so i use that version. Click on "New from Visual Studio Solution" as shown in the figure below.
'DefaultDomain': Loaded 'c:\winnt\microsoft.net\framework\v1.1.4322\mscorlib.dll', No symbols loaded.
'NDocEx1': Loaded 'C:\NDocEx1\bin\Release\NDocEx1.exe',No symbols loaded.
Value is 100
The program '[1944] NDocEx1.exe' has exited with code 0(0x0).
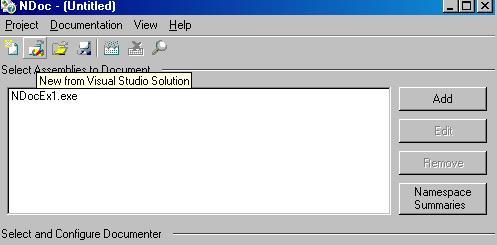
Select the Solution file in the dialog box from where we have store our application. Now compile NDoc. Once its done. Click on View. You will have a ready made document in MSDN style. As u can see the drop down contains a no of options. I have used the default and common MSDN format. Save this as a NDoc project. No need to change anything in the options given below Documentation type as shown in the figure below.
Compile the Project and View the document. We will get a document, something of the type shown in the figure below.
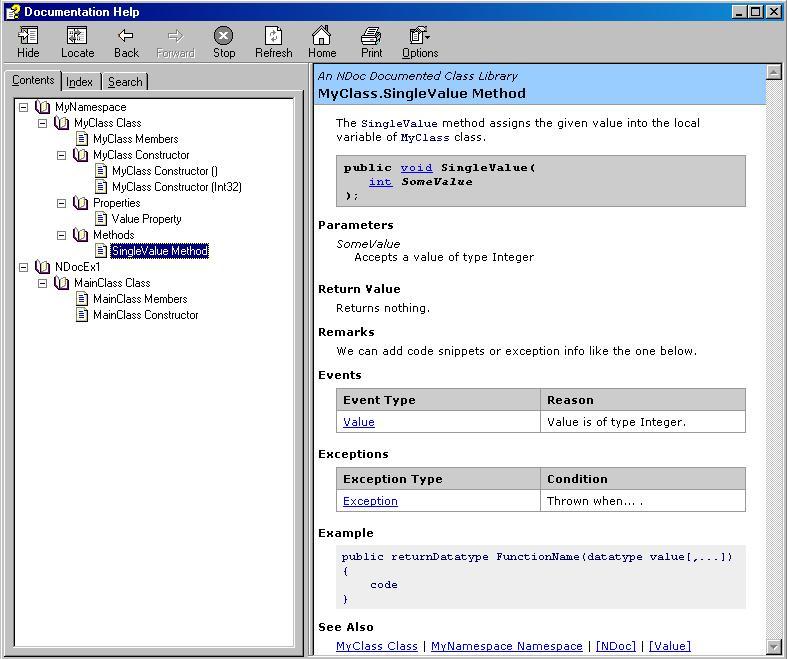
As u can see, we get a nicely formatted document in MSDN format.Now Compare the code in the project with the output document. You can easily understand the code. I have not divulged into the different tags available.
I have tried to use all the important tags that we will be using on a daily basis. Go through
the documentation provided with NDOC for further information.
In the final part of this series, we will see how to use the plug in for VB.NET.
Another good example of the kind that i have given above can be found at this link
http://www.codeproject.com/csharp/CSharpCodeDocumentation.asp
happy documentation
posted by Narasimhan at 5:34 PM
![]()
![]()

1 Comments:
Super Machi... i think u can concentrate lil on cosmetics...
rajjan :)
Post a Comment
<< Home